Showing posts with label Working Mom Meal. Show all posts

Tuesday, May 7, 2013

slow cooker tamale pie


Usually when I think of slow cookers, I think of cold, winter days.  Well I saw this recipe over at Six Sister's Stuff and thought let's try it anyway.  So yesterday on a warm and sunny Monday I made this slow cooker tamale pie.  And you know what?  Slow cooker are also good on warm, spring nights!  My husband said this was amazing.  The cornbread topping makes it taste just like a tamale from your favorite Mexican restaurant.  It's also great for your working moms and those with little time to cook.  You can get the very tasty, very simple recipe HERE.  


Monday, April 8, 2013

How to Trick the Picky Eater: Freshfoods Cook-n-Blend Baby Food Maker Review


Even though Jack is eating solid foods, he is one of the pickiest eaters I have ever seen.  No meat, no cheese, and he has to inspect everything!  Trying new things is an even bigger struggle; I am hoping that this is just a stage and he will soon grow out of it.
So when I was given  the Freshfoods Cook-n-Blend Baby Food Maker from NUK through the Moms Meet blogger program, I was excited to see what I could blend up for him to eat.

The Freshfoods Baby Food Maker is an all-in-one steamer, blender and food processor so that you can make your own, homemade baby food from scratch in one convenient appliance with minimal effort. Since I’ve always been one to make as much of my own household items from scratch as it is, making my own baby food was always something I’d intended anyway. But this food maker simplifies it so that even the most novice of mommas can whip up good-for-you meals for their babes, lickity split.

With the food maker, you can make up to four meals at a time and select whether you want smooth or chunky texture. The machine itself is pretty small so that it’s quite manageable (as compared to my regular food processor). You steam (if necessary) and blend in the same container so it’s not very messy at all, and clean-up is simplified. Plus, if you want to steam two different foods at once, there’s a separate steam compartment so that you can multitask without hassle. Once you set the choices, it only takes about fifteen minutes or so to steam the veggies and then a couple more minutes to puree them and you have fresh, whole-foods dinner ready for baby.

What's great about this maker is that it works great for toddlers.  I can blend up fruit, and sneak in those veggies to make sure he is getting all he needs nutrition wise.. I’ve already tested it out by steaming sweet potatoes and apples and making "apple sauce".  I've also make smoothies with spinach mixed and Jack loved them both.  The best part was that it was SUPER easy to make and even easier to clean up! I can even steam veggies for my husband and I!

If you're interested in trying it yourself, you can download a $20 coupon for the Freshfoods Cook-n-Blend Baby Food Maker as well as print a coupon for any Freshfoods accessory. Find out more about the Freshfoods Baby Food Maker and other Freshfoods products for baby (including freezer trays, a food mill or popsicle molds) on the NUK website or by following NUK on Facebook.

Find the
Freshfoods Cook-n-Blend Baby Food Maker on Amazon.
Disclaimer: I received this product for free from the sponsor of the Moms Meet program, May Media Group LLC, who received it directly from the manufacturer. As a Moms Meet blogger, I agreed to use this product and post my opinions on my blog. My opinions do not necessarily reflect the opinions of May Media Group LLC or the manufacturer of the product.

Tuesday, January 22, 2013

Red Velvet Cake Mix Brownies


So this weekend my husband and I were in the mood for something sweet.  I happened to see these Red  Velvet brownies over at Tater Tots and Jello and decided to try them.  They looked so easy and delicious and they are perfect for the upcoming Valentine's Day. 

I never made brownies using a cake mix, but these are AMAZING.  So chewy and perfectly sweet.  

Red Velvet Cake Mix Brownies Recipe

Makes one 8×8 pan of brownies
Ingredients
1 box of Duncan Hines Signature Red Velvet Cake Mix (18.25 oz)
1 cup (2 sticks) of melted butter
1 whole egg, plus two egg yolks
1 teaspoon of pure vanilla extract
1/4 cup of water
Powdered sugar for dusting
Directions
Preheat oven to 325 degrees and spray 8×8 clear glass baking pan with non stick spray. Use parchment paper to line pan so brownies can easily be removed later and cut into squares.
Combine all ingredients in the bowl of a stand mixer and mix on low just until combined.
Pour brownie batter into parchment paper lined pan and smooth top.
Bake at 325 for 35-40 minutes. Take care not to over bake.
Let brownies cool and cover, then refrigerate overnight or pop in the freezer for an hour or two.
Once brownies are chilled, remove from pan and cut into squares using a serrated knife.
Dust brownie squares with powdered sugar and try to eat just one.  


Thursday, January 17, 2013

Beer and Bacon....yes please

Beer-Candied Bacon

I am sure I have mentioned this before, but I love beer.   Light beer, dark beer, pumpkin, fall, wheat....I love them all.  So when I found this recipe paired with another fav of mine, bacon, I almost lost my mind.  

The two flavors blend so well together and it's a great snack for your upcoming Superbowl party.  The glaze is simple, and throw the bacon in the oven.  The oven makes less mess and cooks to an evenly crisp piece of heaven.

If you are a bacon (and beer!) fan, I'd love to hear if this sounds like something you would like to try.

Beer-Candied Bacon

1 lb thick-cut bacon
1/2 cup brown sugar
1/4 cup + 2 tbsp beer (I used Magic Hat #9)
Preheat oven to 400 degrees. Combine brown sugar and beer in a small bowl, whisking well to form a thin syrup. Set aside.
Line a rimmed baking sheet with aluminum foil. Place a wire cooling rack on top. Place the pieces of bacon on top of the rack, overlapping if necessary. Place in oven and cook for 10 minutes.
Remove from oven and brush one side of the bacon with the beer syrup. Flip, and coat the other side with the syrup as well. Return to oven and cook for 10 minutes. Remove from oven, and repeat process another time or two more, until bacon is crispy and browned, and you’ve used all the glaze.
Cool on wire rack for at least 1 hour before serving.

Saturday, December 8, 2012

Snowball Cookies


One of my favorite memories from growing up is making holiday cookies with my mom.  We made all kids of Christmas cookies, painted ones, sprinkle ones...you name it. Now I just LOVE baking. And these little balls of butter, chocolate and pecans are a no brainer at the holidays.  It is..
 
 the snowball cookie
 
For me it's not Christmas without these simple little cookies
They are pefect to share at your work, holiday party or cookie swap....or they are perfect with a cup of cold milk. While you are sitting in front of the tree. Listening to your favorite Christmas tunes. Try them, and enjoy..


Snowballs (recipe courtesy of inthelittleredhouse.com)**
 
3/4 c butter, room temp
1 tsp vanilla
1 TBS water
1/8tsp salt
1/3 c sugar
1 1/2 c flour
1 c chocolate chips
1 c chopped pecans or walnuts (I choose pecans)
Powdered sugar, for dusting.
 
Cream butter, vanilla, water, sugar and salt. Add flour and mix well. Stir in chocolate and nuts.
Form into 1” balls. Bake at 350° for 20 minutes. Cool for a few minutes. Roll in powdered sugar (or "make it snow" on top of them) while still warm.
 
**I noticed that they tuned out way better when I chilled the dough for 10 minutes before baking, otherwise I had melted snowballs.


Thursday, December 6, 2012

Creamy, Cozy Mushroom Risotto


I have been on this risotto kick lately.  I have never had it let alone made it until last week.  I decided to get out my Italian Cookbook last week and made a wonderful Asparagus Parmesan Risotto.  My husband and I instantly fell in love and so this is how my Mushroom Risotto came about.   Yes it involves a lot of stirring, it is not a recipe you can just set on the stove and walk away from.  But with all that love comes a wonderful simple meal perfect for two.  Enjoy!

 
(image courtesy of google images)


Mushroom Risotto  (adapted from Favorite Italian Cookbook)

5 1/2 cups of chicken broth (or vegetable broth)
1/4 teaspoon salt
2 tablespoons of olive oil
2 cloves chopped garlic
1/3 cup finely chopped onion
fresh sprigs of thyme (or other favorite herb)
1 3/4 cups arborio rice
2/3 cup white wine
1 1/2 cups of diced mixed mushrooms of your choice (I used cremeni and button)
freshly grated parmesan cheese


1. Bring broth to a boil and then turn down and let simmer

2. Heat olive oil and add onion, garlic and thyme and cook for 2-3 minutes

3. Add mushrooms and cook 2-3 minutes more. 

4. Add white wine and stir slowly until all the wine has been absorbed.  Next add broth to mushroom mixture 3/4 of a cup at a time.  Constantly stir until broth has been absorbed and then add next 3/4 cup.  Continue until all broth is gone and arborio is tender.*

*It is very important to keep stirring as this is the secret to a great risotto.

Plate and add salt, pepper and freshly grated parmesan cheese.

(this tastes best with your favorite glass of wine!)


Monday, December 3, 2012

Chocolate Peppermint Crinkle Cookies


My Christmas baking has officially started.  I decided to start the season off with one of my favs...chocolate crinkle cookies.  I posted these 2 years ago on my blog and they such cute little pillows of fudgy delight that I wanted to post them again.  

This time, however, I decided to Christmas them up just a bit more by adding the smallest hint of peppermint.  These give them such a great little twist and go perfect with a tall cold glass of milk.  I know that Santa would go crazy over a plate of these cookies when he stops by your home. 

 This recipe is super easy, and best made while listening to Christmas carol's, watching the snow fall outside,  and drinking a glass of wine.  Enjoy.

Chocolate Crinkle Cookies
Makes about 6 dozen cookies
1 cup unsweetened cocoa powder
2 cups white sugar
1/2 cup vegetable oil
4 eggs
2 teaspoons vanilla extract
2 cups all-purpose flour
2 teaspoons baking powder
1/2 teaspoon salt
1/2 cup confectioners’ sugar
1/2 teaspoon peppermint extract (optional)

In a medium bowl, mix together cocoa, white sugar, and vegetable oil. Beat in eggs one at a time, then stir in the vanilla. Combine the flour, baking powder, and salt; stir into the cocoa mixture.  Add peppermint extract and combine.  Cover dough, and chill for at least 4 hours.

Preheat oven to 350 degrees F. Line cookie sheets with parchment paper. Roll dough into one inch balls with lightly oiled palms. Coat each ball in confectioners’ sugar before placing onto prepared cookie sheets. (I also rolled some in Christmas sprinkles!)

Bake in preheated oven for 10 to 12 minutes. Let stand on the cookie sheet for a minute before transferring to wire racks to cool.

Enjoy!

Thursday, November 29, 2012

Things I love...Christmas Cookies

The second Thanksgiving is over I am thinking, "Christmas Cookies".  If I didnt' have to worry about my figure, I would make Christmas Cookies everyday. It's one of my favorite parts of the season, and I thought I would share a few of my favorite cookie recipes with you.  All are so festive and perfect for that holiday cookie swap you have to go to.


 Chocolate & Peppermint Covered Shortbread


snowballs8

I would love to hear what your fav's are in the comments.  Have a great weekend!


Monday, October 29, 2012

Working Mom Meals: Cream of Mushroom Soup


balthazar cream of mushroom soup
I love soup.  I could eat it every single day.  In fact I think I do.  My mother in law makes the most amazing Polish mushroom soup and I have been meaning to get the recipe from her.   So when I found this recipe from The Smitten Kitchen, I was hoping my husband would not be able to tell the difference from his mother's and this.

And...he gave it 4 stars saying it was "just like my moms!".  This soup is perfect for all of you soup lovers, especially now that the weather is getting colder.   It was pretty easy to make and I doubled the recipe in order to have enough for two days.   You can check out the recipe HERE and enjoy!

Wednesday, October 3, 2012

Things I love Thursday...pumpkin

Growing up, the thought of eating anything pumpkin sickened me.  Who would want to eat that slimy, gross orange stuff?  


Now all I can say is..."Who wouldn't!?!?"  I could post 1,000 delicious pumpkin recipes in this post to show 

all of you that pumpkin is good for more than a latte from Starbucks.  But I will refrain, and instead post 10 amazing recipes you should try this fall.  


pumpkin swirl brownies
 
Pumpkin Gnocchi with Crispy Sage Butter Sauce


 Paula Deen's Pumpkin Bars with Cream Cheese Frosting


3 dips 2
Pumpkin Pie Dip from the Yummy Life


I would love to hear about your pumpkin favs, I hope you are having a great week and enjoy!

Tuesday, August 28, 2012

Craving chocolate? Me too.

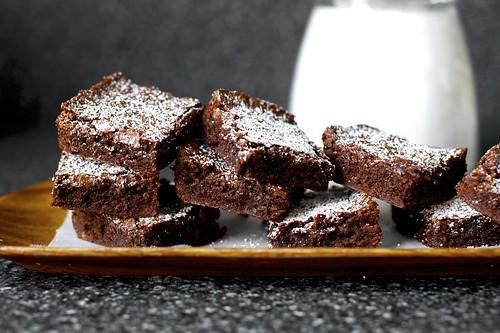
Since I have been super busy starting my BRAND NEW job, and I didn't want you all to think I forgot about you, I thought I would add something that looks super delicious.  This I can guarantee would also be the perfect after school snack. 

Smitten Kitchen's favorite brownies will satisfy that chocolate craving that is screaming your name and will help you make friends (not like you need to!).  

For the recipe, and more great ones, check it out here.


Thursday, August 9, 2012

My try at a pinspiration...

So I am having my sister's bachelorette party this weekend up in Lake Geneva Wisconsin.  I am sure there will be pictures on here next week showing all the fun.  For now I am stressing making sure we have enough food, drinks and fun planned.   Our decor is pink, black and white and I saw these while pinning a few days ago:

So cute right?!?!


So I decided to make my own:
Not too shabby, although I wish they were a bit more pink.    I got the recipe from Joy the Baker here.   Once the dough was made  I added about 7 or 8 drops of red food coloring, (I would add more next time) and mixed the dough well.  Also instead of rolling the dough in white sugar I used pink sugar which added to the pink color.  

The main thing is, they taste delicious, and I think they'll be a hit at the party.  


Thursday, June 21, 2012

Welcome in Summer with Summer Blueberry Corn Salad

hello summer.


I love summer salads.  All the fresh ingredients and they sure go great with a hot summer afternoon.  I came across this little salad on Two Peas blog, and thought, "how strange....blueberries and corn".  I love both and tried it tonight to go along with our burgers.  It was a hit.  The sweetness of the blueberries and corn, the crunchiness of the cucumbers and the kick of the jalapenos make it perfect for your summer bbq, picnic or light side to your meal.  I didn't have jalapenos so I subbed a pinch of cayenne pepper and it did the trick.  This salad can be made ahead of time which makes it super easy for you busy moms!

So let's all welcome the first day of Summer ....enjoy!

Summer Blueberry Corn Salad

Ingredients:

6 ears fresh sweet corn, husked
1 cup fresh blueberries
1 cucumber, sliced
1/4 cup finely chopped red onion
1/4 cup chopped fresh cilantro
1 jalapeno pepper, seeded and finely chopped
2 tablespoons lime juice
2 tablespoons olive oil
1 tablespoon honey
1/2 teaspoon ground cumin
1/2 teaspoon salt
1/4 teaspoon black pepper

Directions:

1. In a large pot, bring water to boiling. Add corn. Cook for 5 minutes, or until tender. When cool enough to handle, cut corn from the cobs.

2. In a large serving bowl, combine corn, blueberries, cucumber, red onion, cilantro, and jalapeno. To make the dressing, whisk together lime juice, oil, honey, cumin, salt, and pepper. Pour dressing over salad and stir until combined. Cover and refrigerate until ready to serve.

Wednesday, April 18, 2012

Working Mom Meals...Shrimp Tacos


So we are trying to eat healthier.  No chocolate, no carbs, no beer, no snacks......who am I kidding.

But we are trying to have healthier dinners, and those delish shrimp tacos above fit the bill.  They are easy for you working moms and the avocado-cliantro sauce goes oh so well.  I found this recipe on Favorite Family Recipes..enjoy!

Shrimp Tacos (serves 2)
  • COLESLAW:
  • 2 cups shredded green cabbage
  • 2 Tbsp Lime Juice
  • 1 Tbsp dried oregano
  • -Toss and season with salt.


  • CILANTRO DRESSING:
  • 1/2 cup mayo
  • 1/2 avocado
  • 1/2 cup cilantro
  • 3 Tbsp lime juice
  • 1/8 tsp cayenne pepper
  • -Mix thoroughly in a blender adding a little water if needed.

  • SHRIMP:
  • 1/2 pound shrimp
  • pinch of sugar
  • 1 Tbsp vegetable oil
Instructions
  • Peel shrimp, pat it dry, season with salt, pepper, and sugar. Heat oil over high heat and add shrimp. Cook until shrimp are curled and pink.
  • Layer the sauce, shrimp, and cabbage in a warm corn tortilla. We topped it with a little cotija (or feta) cheese.

Tuesday, April 10, 2012

eggs eggs everywhere...a working mom meal

So I am not a big egg fan.  I don't really eat eggs for breakfast and don't usually like the smell of hard boiled.  But I like egg salad.  Jack and I did some Easter egg coloring last week and so we had all of these beautiful eggs sitting in our fridge.

Then I came across the blog Grab a Plate.  She featured an avocado egg salad which I immediately fell in love with.  Avocados make everything better.  Last night I made it.  In the dark in my kitchen. (I don't know why I didn't just put a light on). This is the instagram picture I got.

I am still working on my Instagraming techniques.

The picture from Grab a Plate is much better.

This Avocado Egg Salad is pretty excellent The avocados are an great creamy sub for all of that mayo found in most egg salad recipes.  I did add a bit of mustard to the recipe below because I like that added taste to my egg salad, I also added more lemon juice to give it that extra zing.

IF you are looking for a way to use all of those Easter eggs, and want something a bit different, try this, it's sos easy, fast, and delish.

Ingredients

  • 4 hard boiled eggs, chilled and peeled
  • 1 avocado cut into 1/2-inch pieces
  • 4 radishes, finely chopped
  • 1 green onion, finely chopped
  • 1 tablespoons low-fat mayonnaise
  • 1 tablespoon parsley, finely chopped
  • 3 tablespoons lemon juice
  • Zest of half a lemon
  • 1/4 teaspoon salt, to taste
  • 1/8 teaspoon ground black pepper, to taste
  • 1 teaspoon of mustard

Directions

  1. Hard boil 4 eggs. Once cooled, peel them and separate the yolks from the whites. Dice the whites into small pieces.
  2. In a large bowl, combine the egg yolks, avocado, mustard, and non-fat mayonnaise. (at this point you can mash or leave slightly chunky, like I did)
  3. Mix in the lemon juice, zest, parsley, radishes, green onion and salt and pepper to the mixture. Taste and adjust the seasoning.
  4. Gently fold in the diced egg whites and combine.
  5. Chill until ready to use. Serve as you like!

 Serves 2-3


Monday, March 12, 2012

Chocolate Chip Coffee Cake


I have a weakness....and it's name is chocolate chips.  I am not a big cake or dessert person, but give me something with chocolate chips in it, and I'm done.  This chocolate chip coffee cake recipe from two peas and their pod, is one of those recipes that does me in.  Cinnamon, chocolate and the light and fluffy texture will make anyone's morning, afternoon or long day at work better.  I promise. 


Chocolate Chip Coffee Cake

Yield: 9-12 pieces of cake
Cook Time: 40 minutes

ingredients:

2 cups all-purpose flour
1 1/2 teaspoons baking powder
1 teaspoon baking soda
1/2 teaspoon salt
1 cup granulated sugar
1/2 cup butter, at room temperature
2 large eggs
1 cup sour cream
1 teaspoon vanilla extract
1 cup chocolate chips
Cinnamon Sugar Topping/Filling:
1/4 cup granulated sugar
3 tablespoons brown sugar
1 1/2 teaspoons cinnamon

directions:

1. Preheat the oven to 350°. Grease an 8-inch square baking pan and set aside.
2. In a medium bowl, whisk together the flour, baking powder, baking soda, and salt. Set dry ingredients aside.
3. Using an electric mixer, cream together the butter and 1 cup sugar until fluffy, about 5 minutes. Add in the eggs, one at a time, beat until smooth. Beat in the sour cream and vanilla extract. Mix until well combined.
4. Slowly add in the dry ingredients. Mix until just combined. In a small bowl, make the cinnamon sugar topping/filling. Stir together sugar, brown sugar, and cinnamon. Spread half of the batter into the prepared cake pan and sprinkle with half the cinnamon-sugar and half the chocolate chips. Spoon the remaining batter over the filling, spreading gently. Sprinkle with the remaining cinnamon-sugar and chocolate chips.
5. Bake until golden and a toothpick inserted in the center comes out clean, about 40 minutes. Cool to room temperature and serve.